Showing posts with label icing sugar. Show all posts

Sunday, January 5, 2014

The Cronut

 photo IMG_1168copy.jpg

 photo IMG_1121.jpg

 photo IMG_1197.jpg

 photo Cronut_1.jpg

 photo IMG_1148.jpg

 photo IMG_1231.jpg
Ah, the mythical cronut - part croissant, part donut, all noms. Tales of its sweet delights travelled to us one night on the television when Dominique Ansel was on Late Night with Jimmy Fallon to cook his beautiful creation. I haven't had the New York City cronut but I found a recipe for an imitation version by Edd Kimber.

These babies are an absolute treat - flaky, buttery and scrumptiously fluffy. To make these, you'll need a bit of patience and a lot of kitchen counter space. But once you cut out your little cronut discs and lower them into the oil to fulfill their delicious destiny, you'll know it was all worth it.

Ingredients
60ml milk
65ml warm water
6g dried yeast
150g cold diced butter
250g plain flour (The recipe calls for 125g plain flour and 125g strong flour. I couldn't find strong flour so I used all plain flour and added bread improver.)
5g bread improver
30g caster sugar
½ teaspoon salt
vanilla sugar
icing sugar
milk
vanilla extract

1. Combine milk, water and yeast in a bowl.
2. Pulse the cold butter, flour and bread improver in a food processor until it looks like lumpy breadcrumbs.
3. Combine the flour mixture, the wet mixture and the caster sugar and salt until form into a dough. Cover with cling wrap and fridge for 2 hours.
4. Roll the dough into a rectangle about 1cm thick. Fold the dough into thirds, turn and roll again. Repeat this 2 times. I found the dough to be quite sticky at the beginning of the rolling but by the time I folded it a few times, it became a nice, smooth dough.
5. Cover dough with cling wrap and fridge for at least 4 hours or overnight.
6. Roll out the dough to about ½cm thick and cut out your cronut discs with cookie cutters. Put the discs on a tray lined with baking paper, cover with a tea towel and let prove for 1 hour.
7. Fry cronuts in oil at 170ºC until puffed up and golden.
8. Drain on paper towels and toss in vanilla sugar.
9. Make glaze by mixing icing sugar, vanilla extract to taste and a splash of milk. Drizzle on cooled cronuts.

Tuesday, April 20, 2010

Raspberry Sorbet, Toffee and Lime

When I think about foods like blue cheese or even something simple like meringue, I always wonder how people came to invent these recipes. How did someone know to leave cheese to age for a few years or beat egg whites for a long time and then bake it? Well a few nights ago I had a similar revelation: I stumbled across how to make a really great sorbet.

It started with a long day of uni work, coming home spent and having to push on into the night. I needed a raspberry smoothie. Bad. I blended raspberries, ice cubes, icing sugar and fruit juice together and found that it had the texture (if not a bit softer) of sorbet. Then I remembered from an episode of The Naked Chef that sorbet is essentially frozen sugar and water. Man am I glad I made a smoothie that night, because I never knew making sorbet was this simple!

So now that I don't have back-to-back assignments, I decided to make it again tonight with some adjustments. I added a thick sugar syrup with glucose so that it'd hold and it'd have that lovely thick texture of mango sorbet. I've got to say, I am really happy with this recipe so I hope you guys enjoy!

Raspberry Sorbet

2 milk glasses of ice cubes (smoothie measurements!)
1 milk glass of raspberries
½ cup sugar
¼ water
1 cinnamon quill
1 teaspoon vanilla extract
1 tablespoon glucose
Icing sugar to taste

Place sugar, water, cinnamon, vanilla extract and glucose in a saucepan over medium heat. Bring to the boil then simmer for 5 minutes. Remove from heat, take out the cinnamon quill and cool completely.

Place ice, raspberries and sugar syrup in a blender. Blend until smooth.

Depending on the sweetness of the raspberries, you may want to add icing sugar for extra sweetness.

Set in a shallow dish in the freezer overnight.

Toffee Shell

½ cup sugar

Lightly grease the backs of metal tablespoons.

Heat the sugar over medium-low heat until the it liquifies and colours slightly. Remove from heat. Cool until you can make ribbons on the surface.

Drizzle over the spoons in criss-cross patterns.

Cool the spoons in the freezer for a minute and gently remove toffee from spoon.

Set aside at room temperature.

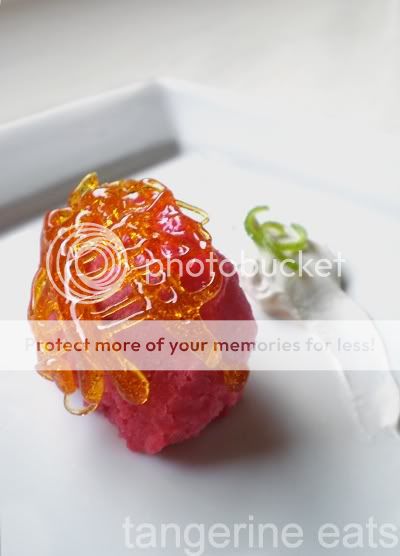
Mould the sorbet with two tablespoons and fit the toffee shell onto one side. Serve with creme fraiche and candied lime zest. It's creamy, sweet, fruitily refreshing and the toffee adds a crunch to it.

Friday, March 19, 2010

Macarons Part I: Basic French Macaron Shell


They say that making macarons is an endeavour best left to the French. After several failed attempts, I realised that there is a lot of wisdom in that adage.


Except that when I want something, I will not stop until I succeed. Maybe it's the law student ambition in me; maybe it's my passion for food that doesn't let me shy away from a challenge.


Using David Lebovitz's blog as a starting point, I read and read about the meticulous method of making macarons. As Lebovitz explains in "Making French Macarons: Instructions & Recipes", making macarons is more about technique rather than following a recipe. For tips on macaron shell technique, I found David Lebovitz, Duncan Markham at Syrup and Tang and Corry at Bake It Off to be the most useful sources on the internet.

I tried out two recipes: Duncan Markham's recipe for a basic French macaron and Pierre Hermé's recipe for hot sugar syrup macarons. These recipes were by no means fool-proof or simple to master because they didn't involve the use of cream of tartare or lemon juice to aid the formation of stiff peaks in the egg whites. It took me about 15 eggs, almost 1kg of almond meal and 3 whole days in the kitchen to make a decent macaron shell. There were tears, tantrums and the spontaneous shouting of "Why!" and "It's not fair!" in my sleep. But imagine my joy when I'd made a bona fide French macaron!


However, it was a long learning process. My first few attempts came out porous and deflated. I couldn't understand why - I'd followed the recipes to the T. Dan's mother Barb suggested that I start from basics, beating an egg and making meringue. It made sense, getting to know the science of how the ingredients interact with each other, taking one step at a time. So that's what I did - no colouring and no added flavours (my ambitious strawberry syrup did not work with the macaron batter). I focused on the 4 ingredients used in Duncan Markham's recipe: egg whites, almond meal, icing sugar and castor sugar.

Working with the 4 ingredients


Egg whites


Using 1 egg, I tested how far I could beat it without curdling it. This gave me a better grasp of what soft, medium and stiff peaks looked like. The best way to test which stage you are at it is to stop beating every minute or so and lift the beaters out to see. When it reaches soft peaks, the egg whites will look like a sudsy foam with visible bubbles. Medium peaks means that the bubbles are barely visible and when you lift the beaters out, it will rise up and flop back down. I couldn't actually reach stiff peaks without castor sugar (as it helps bind egg whites). You will know you've got stiff peaks when the mixture is glossy, has obvious ripples and when you lift the beaters the peak will stand up on its own. Edit: Between medium and stiff peaks, the castor sugar will make the egg whites increase in volume. If it decreases in volume again, you've overbeaten it. However, it is salvageable. Bake at a lower heat for longer so that you don't get a hollow shell.


Beating egg whites is finicky enough but with macarons there are about 4 other fronts you have to worry about:


(1) Fineness and dryness of almond meal
Whether you use whole almonds (raw, not blanched) or packaged almond meal from the supermarket (which I found doesn't work that well anyway) you need to prep it before using it in macaron mix. Fineness isn't crucial but creates a smoother shell so that it's nicer on the eyes. Dryness, however, is key because excess moisture will cause the egg whites to collapse. Preheat the oven to 150°C. Blitz the almonds or almond meal in a food processor for 1 minute. Remove lid and use a spatula to loosen all the ground almond at the bottom. Blitz for another minute. Spread into a thin layer on a baking tray. Put in the oven for 5 minutes. Cool completely.


(2) Dryness and temperature of egg whites
As egg whites contain water, you want to dry out that excess moisture for perfect macarons. To do this, separate your eggs 2 days in advance. Place the egg whites in a shallow bowl and let stand at room temperature. You can cover it, but use something that'll let it breathe, like a tea towel. Egg whites beat better at room temperature, so don't fridge them during these 2 days!


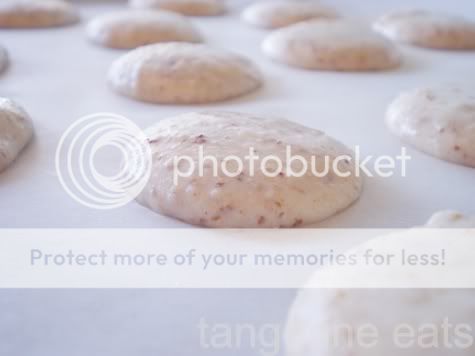
Just piped


Rested for 20 minutes


(3) Speed of incorporation
One of the most important things I learnt during my mistake runs is that you need to be fast when incorporating the dry ingredients with the wet ingredients. If you work too slowly, the egg whites will deflate and your macarons will be firm and chewy. When folding the dry ingredients into the egg whites, scrape the edge of the bowl in a semi-circle, then fold into the middle. You want to get rid of the excess air so use a bit of force.


(4) Prepping your utensils
For beating egg whites in general, always beat in a clean glass bowl, making sure that the bowl and the beaters are completely dry to begin with. Use the smallest bowl you can so that the egg whites will get maximum beatage. When baking, use thick baking trays, or stack two together (with no gap in between), lined with baking paper. You can stick down the baking paper with blobs of macaron mixture in each corner.


Macarons au blanc monté (French meringue)
Recipe courtesy of Duncan Markham ("La Macaronicite 2: basic technique and simple macaron recipe", Syrup and Tang)


1 part egg white (50g)
1.3 parts almond meal (65g)
1.6 parts icing sugar (80g)
0.8 parts castor sugar (40g)


Blitz almond meal and icing sugar in a food processor for 1 minute.


Beat the egg whites on a medium speed until medium peaks form. Gradually add castor sugar and beat until stiff peaks form.


Sprinkle half of the dry ingredients over the egg whites and fold in with a spatula. Fold in remaining dry ingredients. This is also when you would add food colourings.


When done, you should be able to make a ribbon on top that takes at least 30 seconds to disappear.


Prep baking trays and spoon batter into piping bag with a 1cm wide nozzle.


Holding the nozzle close to the baking paper, pipe your macarons about 4cm apart. Try to make them round and flat (you can dip your finger in water and smooth out the tops if needed).


Tap the tray on a flat surface to get rid of excess bubbles.


Preheat the oven to either 120°C (baking time: 20 minutes) or 180°C (baking time: 9 minutes).


Rest the shells after piping for at least half an hour in a dry place.


Bake for 18-20 minutes in the middle shelf. If doing more than one tray, bake one tray at a time.


Remove baking paper from tray and cool on a wire rack. Gently remove macaron shells from baking paper and continue cooling face up on the wire rack.


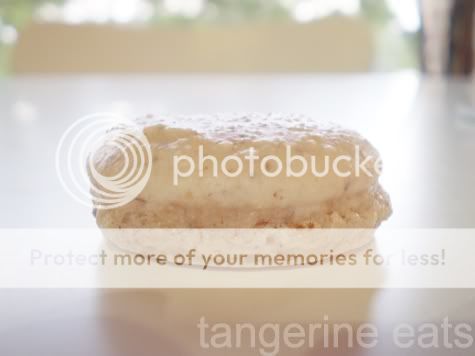
Refrigerate in an air-tight container for at least 1 day before filling.


9 minutes at 180°C


20 minutes at 120°C


Stay tuned for the hot sugar syrup recipe and ganache filling!


Wednesday, February 17, 2010

Ridiculously Rich Chocolate Cake

I received this set of Simple Essentials cookbooks by Donna Hay for my birthday last year (thanks Barb!). When every recipe in this chocolate edition is absolutely drool-worthy, there's only one thing to do: combine 3 of them to create a monster of a cake! With almost one kilo of chocolate and half a kilo of butter in it, this is by far the most indulgent cake I've ever had.

Chocolate mud cake

375g butter, softened
1⅓ cups brown sugar
3 eggs
2 cups plain flour
½ teaspoon baking powder
⅔ cup cocoa powder, double sifted
200g melted dark chocolate
¾ cup milk

Preheat oven to 160°C. Cream the butter and sugar with an electric beater for 8-10 minutes, or until the mixture is light and creamy. Gradually add eggs and beat well. Sift flour, baking powder and cocoa powder, then fold into the butter and sugar. Fold melted chocolate in. Spoon mixture into a 22cm round cake tin (I used one with a removable base), lined with baking paper. Bake for 1¼ hours. Cool in tin.

Wrap the cake in plastic and place in freezer for at least 2 hours. Using a bread knife, level off the top of the cake. Turn upside down so the base is the top. Cut the cake in half, horizontally.

Chocolate mousse filling

2 teaspoons powdered gelatine
2 tablespoons water
200g dark chocolate, chopped
75g butter
2 tablespoons cocoa powder, sifted
4 eggs, separated
1 cup single or pouring cream
3 tablespoons icing sugar, sifted

Place water and gelatine in a bowl. Set aside for 5 minutes. Melt chocolate, butter and cocoa in a saucepan over low heat until smooth. Remove from heat and stir in gelatine mixture until dissolved. Pour mixture into a bowl. Add egg yolks gradually, beating well. Set aside. Whisk the cream with electric beater until soft peaks form. Set aside. Whisk egg whites with electric beater until soft peaks form. Gradually add icing sugar. Whisk until thick and glossy. Gently fold egg white mixture with chocolate mixture. Fold the whipped cream through.

Place bottom layer of chocolate mud cake back in the round cake tin. Pour chocolate mousse filling on top. Wrap up top layer with plastic again. Fridge for 2 hours. Remove from cake tin (this is where the removable base comes in handy) and put top layer on. Set aside in fridge.

Chocolate truffles

400g dark chocolate, chopped
¾ cup single or pouring cream
Cocoa powder, sifted

Melt chocolate and cream over low heat until smooth. Pour mixture into a 15x18cm dish lined with baking paper. Fridge for 2-3 hours. Roll tablespoons of mixture into balls. Dust with cocoa powder. Fridge for another hour.

For a nice touch, decorate the top of the cake with chocolate truffles around the edge. If you're not serving it immediately, I suggest serving the chocolate truffles on each plate as they will melt if left out of the fridge for too long.

Chocolate mud cake, chocolate mousse filling and chocolate truffles recipes from Simple Essentials: Chocolate by Donna Hay.

Enjoy!

Thursday, January 21, 2010

Chocolate Mousse Trifle

When I think Summer, I think pastel sundresses, straw hats and fun-shaped popsicles. However, since chocolate cravings transcend seasons and I love the way the blood pink of cooked strawberries looks under the sun, this chocolate mousse and strawberry trifle is a fitting way to kick off this blog on a fine Summer's day. It is so simple to make and so, so delicious.


You'll need:

100g milk chocolate, melted
100g dark chocolate, melted
6 egg whites
230ml thickened cream
¼ cup icing sugar
1 punnet strawberries
¼ cup sugar
¼ cup water
8-10 Butterscotch Fingers
Kahlua

Serves 4-6

Place strawberries, sugar and water in a saucepan and simmer over low heat until the syrup becomes a deep red. Cool in fridge.

Melt chocolate in a glass bowl above simmering water. Use the lowest heat. Remove from heat right before the last pieces melt completely.

Beat egg whites until soft peaks form.

Fold the melted chocolate into the thickened cream. Fold in egg whites and icing sugar.

Layer strawberry coulis, biscuits (drizzled with Kahlua) and mousse mixture into martini glasses.

Set in freezer for 3 hours.

This mousse is ridiculously rich and indulgent. It's intensely chocolatey, velvety and thick - well worthy of the attention a main course demands. Enjoy slowly!