Showing posts with label homemade. Show all posts

Sunday, December 26, 2010

Homemade Jam: Fig, Strawberry & Ginger


Jam is one of those things you have to keep in the house. When you think of good foods like turkey sandwiches, scones, toast, trifle, spongecakes, jam really ought to be a food group in itself. This year, I decided to make a few batches of jam and give them to family as gifts. Unlike with biscuits or cake (foods that don't make it past Christmas day), every time your loved ones stick a knife in your homemade jam, they'll think of you.

Jam is surprisingly dead easy to make. If you find good quality fruits that are more or less unripened, you really only need 3 ingredients: fruit, sugar and lemon juice. You can add spices or infuse your jam with things like citrus zest or ginger. You can even play around with consistency by putting in some ripened fruit or simmering for shorter or longer.

I decided to make two batches: fig jam, and strawberry and ginger jam. You need unripened fruit because they contain a higher level of pectin, a natural setting agent. Figs are really ripe this time of year so I used the firmest ones I could find. Somehow they made a nice, thick jam. Both jams were delicious and all up took around a day to make.

Fig jam


You'll need:
1kg figs
500g castor sugar
Juice of 1 lemon
Glass jars

Preheat the oven to 110̊C.

Place jars in the oven to sterilise. Place the lids in too if they're oven-safe. Otherwise, put them in boiling water while you make the jam.

Quarter the figs and coat well with caster sugar in a large bowl. Keeping the excess sugar, cover and place in fridge until the juices come out (at least 6 hours).

Transfer to a deep pot and place on a medium heat.

Once the sugar is melted, remove the fruit and simmer the syrup for 10-15 minutes.

Return the fruit to the pot and simmer for about half an hour, stirring occasionally.

When it is thick and jammy, take your jar out of the oven and spoon the jam in while the jar is hot. Put the lid on immediately and leave it to cool. Once cool, store in fridge.

Makes around 1 litre.

Strawberry and ginger jam


You'll need:
1kg strawberries
1kg sugar
2 tablespoons ginger, sliced lengthways
Juice of 1½ lemons
Glass jars

Preheat the oven to 110̊C.

Place jars in the oven to sterilise. Place the lids in too if they're oven-safe. Otherwise, put them in boiling water while you make the jam.

Halve or quarter them and place in a deep pot.

Place sugar and ginger in the pot.

Place the pot on a medium heat and stir until the sugar is melted.

Once melted, bring to the boil and gently simmer for about half an hour, stirring occasionally. During this time, taste it regularly and take out the ginger when it's infused to your liking.

Add lemon juice.

When it is thick and jammy, take your jar out of the oven and spoon the jam in while the jar is hot. Put the lid on immediately and leave it to cool. Once cool, store in fridge.

Makes around 2 litres.

Enjoy!

Monday, May 10, 2010

Mother's Day Vegetarian Banquet

Cooking up a feast for my mother is no usual challenge. You see, she is vegetarian and doesn't eat onion or garlic. This year, I didn't want to just bake a cake or make something bland tasting. So I took a leaf from the MasterChef book (so to speak) and looked back to my childhood.

Growing up, my mum often served tofu, eggplant and lotus root at dinner. It's funny how foods I used to take for granted I now find really interesting and fun to cook. The best part of the banquet was that I got to teach my mum new flavours for vegetarian cooking as well as it being an homage to the food of my childhood.

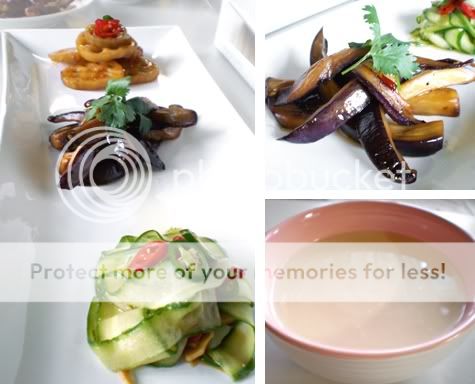
I decided to make an entrée of agedashi tofu with a red papaya salad, a platter of lotus root, eggplant and cucumber salad, and a soy and sweet ginger soup for dessert.

Agedashi tofu with red papaya, chili and sweet spicy Asian dressing

This was so amazing. The tofu had a light crispy outside and an almost silkened inside. The freshness of the papaya perfectly set off the sweet, spicy and salty dressing. I would've been happy if this was the only thing I'd made!

1 packet momen tofu
½ cup potato starch
Vegetable oil for frying
½ red papaya
½ carrot
1 long red chili
1 long green chili
Luke Nguyen's Vietnamese dressing (I took out the garlic)

Heat oil in a deep-fryer or a deep wok to roughly 170°C.

Cut tofu into 16 pieces and coat with potato starch (try to pack on as much as possible for extra crispiness).

Drop each piece gently into the oil down the side. Fry until lightly brown. Drain on paper towel.

Thinly slice papaya and chilis and julienne the carrot. (I julienned mine very roughly!)

Arrange tofu and salad on plate and drizzle the dressing over.


From top to bottom: caramelised lotus root, eggplant salad and cucumber salad (recipes courtesy of Kylie Kwong)

An interesting ingredient used in the first two recipes was the shao xing wine. I had never heard of it but when I smelt it, I recognised it from my grandparents' cooking. It's a very pungent rice vinegar wine, used in dishes affixed with the word "drunken". When cooked, it has a very unique sour flavour that goes incredibly well with vegetables. I did have a bit of trouble finding this in the Asian grocery store though. The bottle doesn't actually have "shao xing" written on it - it's all in Chinese! I would suggest either looking on the little shelf tags in the vinegar section or asking someone.

Eggplant is great for such intense flavours because it soaks it all up. I stir-fried my eggplant (instead of steaming) and I added chili and coriander. The end result was a piece of eggplant that was so delicious and firm enough for it to feel a bit meaty.

Caramelised lotus root

I'm not too sure how readily available fresh lotus root is in Sydney. Kylie Kwong recommends Randwick Oriental Supermarket in Kingsford for fresh Chinese ingredients, and they do stock lotus root. I remember that my mum sometimes used pre-sliced and frozen lotus root, so that's what I got from my local Asian grocery store.

Lotus root has the most interesting texture. I would liken it to water chestnut, but less smooth. The strange and robust texture goes really well with the sweetness. Because it's cooked on high heat for about 10 minutes, it creates this brown, sticky and caramelised sauce.


Cucumber salad

I love how simple and refreshing this is after sweet, sour and spicy. Even though the dressing is hot and sour, the juicy cucumber cuts through it all and balances out the flavours.

For dessert I wanted to make a tofu pudding (dao fu fa). I used to love it at yum cha. It's meant to be a really wobbly pudding (wobblier than panna cotta) in a sweet and warm ginger soup. However, my pudding didn't set in time so I served it as a rich soy milk soup with the ginger syrup swirled through. It was still really cute (especially in my new pink Marie Claire ice cream bowls!) and YUM, so I wasn't too bummed about it not being perfect. But not to worry, I'll try it again and share the recipe next time.

I hope everyone enjoyed Mother's Day!

Tuesday, April 20, 2010

Raspberry Sorbet, Toffee and Lime

When I think about foods like blue cheese or even something simple like meringue, I always wonder how people came to invent these recipes. How did someone know to leave cheese to age for a few years or beat egg whites for a long time and then bake it? Well a few nights ago I had a similar revelation: I stumbled across how to make a really great sorbet.

It started with a long day of uni work, coming home spent and having to push on into the night. I needed a raspberry smoothie. Bad. I blended raspberries, ice cubes, icing sugar and fruit juice together and found that it had the texture (if not a bit softer) of sorbet. Then I remembered from an episode of The Naked Chef that sorbet is essentially frozen sugar and water. Man am I glad I made a smoothie that night, because I never knew making sorbet was this simple!

So now that I don't have back-to-back assignments, I decided to make it again tonight with some adjustments. I added a thick sugar syrup with glucose so that it'd hold and it'd have that lovely thick texture of mango sorbet. I've got to say, I am really happy with this recipe so I hope you guys enjoy!

Raspberry Sorbet

2 milk glasses of ice cubes (smoothie measurements!)
1 milk glass of raspberries
½ cup sugar
¼ water
1 cinnamon quill
1 teaspoon vanilla extract
1 tablespoon glucose
Icing sugar to taste

Place sugar, water, cinnamon, vanilla extract and glucose in a saucepan over medium heat. Bring to the boil then simmer for 5 minutes. Remove from heat, take out the cinnamon quill and cool completely.

Place ice, raspberries and sugar syrup in a blender. Blend until smooth.

Depending on the sweetness of the raspberries, you may want to add icing sugar for extra sweetness.

Set in a shallow dish in the freezer overnight.

Toffee Shell

½ cup sugar

Lightly grease the backs of metal tablespoons.

Heat the sugar over medium-low heat until the it liquifies and colours slightly. Remove from heat. Cool until you can make ribbons on the surface.

Drizzle over the spoons in criss-cross patterns.

Cool the spoons in the freezer for a minute and gently remove toffee from spoon.

Set aside at room temperature.

Mould the sorbet with two tablespoons and fit the toffee shell onto one side. Serve with creme fraiche and candied lime zest. It's creamy, sweet, fruitily refreshing and the toffee adds a crunch to it.

Thursday, April 15, 2010

African Food Safari: Doro Wat

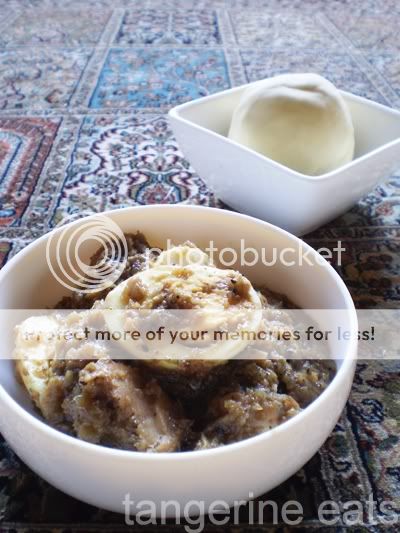
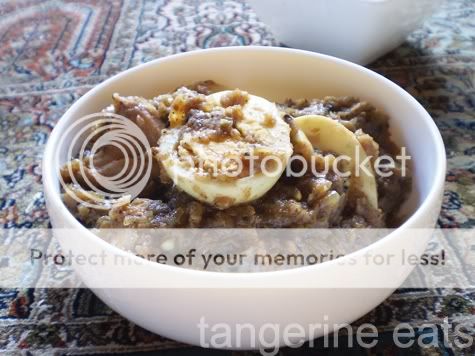
Doro wat served with fufu

Doro wat
is a wonderfully earthy and sweet red chicken stew originating from Ethiopia. It's cooked long and slow, like many African dishes, using onion as a base flavour. The method is very particular and interesting - it calls for 3kg of onions cooked over medium-low heat for an hour with no added liquids. Oils and spices are added, then chicken that has been soaked in vinegar and lemon juice, more ground spices and finally, hard-boiled eggs. The result is a rich, thick and dark stew that looks like a North Indian or Nepalese curry. The texture is very close to dhal and madras but it is much sweeter than any curry I've ever tasted.

This took me almost three hours to make. First I made the niter kibbeh. I love that I was confident about making it a second time 'round and I didn't have to stress over a pot of hot butter. Next I chopped the onions in a food processor and cooked it for an hour until reduced. To that I added olive oil, niter kibbeh and berbere.

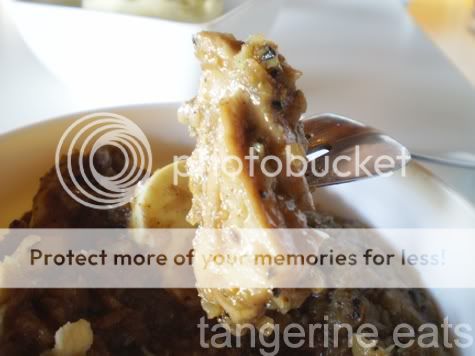
I found the next step interesting because I'd never done it before. I soaked chicken pieces in 2 parts vinegar and 1 part lemon juice for 15 minutes before cooking. This keeps the chicken tender and juicy even after the long cooking process and you can't taste the vinegar or lemon in the finished dish. (This is a fantastic little trick for stews and pies!)

Look how succulent that piece of chicken is

Cardamom seeds, nigella seeds, ajowan seeds, black peppercorns and salt are ground in a mortar to a powder and stirred into the stew. When the stew has reduced and the chicken is cooked through, hard-boiled eggs are added before removing from the heat.

Fufu

Doro wat
is traditionally served with injera but since I couldn't get my hands on any, we had it with fufu, an African starch staple made from dried and ground plaintains. The flour is mixed with water until a thick paste forms, then it's kneaded over heat with a wooden spoon and moulded into a ball by hand. It tastes like a dry and starchy potato mash and is great with stews and soups. I loved ripping little bits off with my fingers and eating it with mouthfuls of chicken.

Recipe by Karim Degal from the Food Safari cookbook.

Tuesday, April 6, 2010

Easter Egg Mousse Cups

It's no secret - I am a very busy lady. I wish I could say it's because I lead an exciting life, but I can't. No, that's not true - today I cracked open a double-yolked egg. Anyway, spare time is hard to come by and over the four day Easter long weekend, I could only find four consecutive hours to shop for ingredients and cook. This really put a kibosh on my dream of making something extravagant like a simnel cake (oh cake with balls of marzipan, fate will bring us together one day).

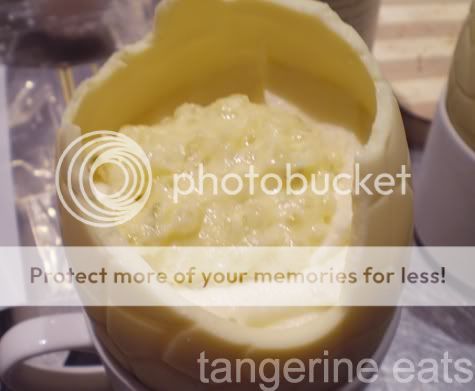
So I decided to turn something simple into something exciting: chocolate easter eggs, filled with chocolate mousse, filled with a choice of toppings.

I used my chocolate mousse recipe with white chocolate.

Even though it sounds dead easy, there was a little drama. After buying two easter egg moulds from Wheel & Barrow ($6.95 each), I got home and realised they were useless unless you wanted giant balls of solid chocolate. I cheated and drove back to Chatswood Chase to buy pre-made chocolate eggs, but if you want to make easter eggs yourself, opt for thin and flexible plastic moulds and use lots of oil.

The fillings were the most fun to make, and Dan even helped out! After the beautiful Easter dinner Dan's mum prepared for us, Dan and I served up these babies while everyone picked which topping they wanted.

Butterscotch sauce (recipe courtesy of smitten kitchen)

¼ cup butter
½ cup packed brown sugar
½ cup heavy cream
½ teaspoon sea salt
teaspoons vanilla extract

Melt butter over medium heat and add sugar, heavy cream and salt. Combine well. Remove from heat and add vanilla extract. You can add more salt to taste. I love the contrast of sweet and salty in dessert.

Lime and tapioca pudding

100g white chocolate
½ cup heavy cream
Zest of 1 lime
Juice of ½ a lime
2 tablespoons tapioca seeds

Simmer tapioca seeds in water for 15 minutes or until they turn translucent. Heat chocolate, cream and lime zest over low heat. Combine well. Remove from heat and gradually whisk in lime juice (like you would when whisking lemon juice into hollandaise sauce). Drain tapioca and stir in. This has the wonderful texture of rice pudding and tastes heavenly.

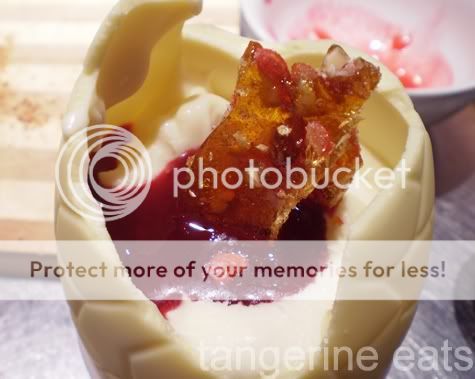
Raspberry with vanilla almond praline

1 punnet raspberries
cup sugar
Handful of candied vanilla almonds

Heat raspberries and ¼ cup of sugar over low heat for 10-15 minutes, stirring occasionally. Push through a fine sieve and you have a raspberry coulis. Set aside. Heat 1 cup of sugar over low heat until it caramelises. Place the almonds in a ziplock bag and crush with a mallet or rolling pin. Lay out in a flat layer on a baking tray, lined with greaseproof paper. Pour caramel over and set in the fridge. Score the praline and break into pieces to serve.

Salted duck egg yolk

I was most excited about this one purely because I was so curious about whether or not it'd taste good with chocolate (it works with moon cake, so why not other desserts?). You can buy salted duck eggs from Asian grocery stores or you can make them yourself by preserving duck eggs in salt water for 3-4 weeks. I love the texture of salted duck egg yolk, it's so unique. It's not as dry as chicken egg yolk (when cooked through), it's firm to the touch but it melts in your mouth. As I suspected, it worked amazingly well with the chocolate mousse. It was slightly sweet, slightly salty, and with the mousse it was like eating moon cake ice cream.

I hope everyone had a lovely Easter weekend. I cannot wait for the carnie food at the Royal Easter Show!

Monday, March 22, 2010

African Food Safari: Kulwha


I hate humid and sticky days. I hate the sluggishness, the way ice creams melt in your hand before you can eat them, getting splashed incessantly at the pool because everyone's cooling off the frugal way. In fact, the only two things that thrived in the heat yesterday were my cats and the amazing fragrance of freshly ground spices in my kitchen. But if you could have smelt it, you'd agree that sweating over a stove isn't a bad way at all to start off a stinking hot Sunday morning.


Nigella seeds, fenugreek seeds and cardamom pods ground with a mortar and pestle

To make kulwha, you must first make niter kibbeh, a spice-infused clarified butter. 500g of unsalted butter is gently simmered for half an hour until it separates, at which point, you infuse the oil with spices and discard the milk fats. Allow to cool and you can use this as a wonderfully aromatic cooking oil.

Curdling butter

Niter kibbeh

The niter kibbeh is then cooked with olive oil, green chili, onion, tomato, an African spice mix called berbere and diced lamb over high heat to make the Eritrean stir-fry kulwha. Put this in the fridge for a few hours for the flavours to stew and then serve with injera or rice.

I love how quickly and simply this all comes together. It only needs 3 or 4 minutes in the pan so that the tomato and lamb retain their juiciness. The flavour is again surprisingly mild but delicious. It's spicy but not hot, the tomato and onion are sweet, the lamb is juicy and meaty and you can taste the distinct flavour of the niter kibbeh, which tastes as beautiful as it sounds. If you're a fan of earthy and understated spices, this is definitely worth a try.

Recipe by Rahel Ogbaghiorghis in the Food Safari cookbook.

Friday, March 19, 2010

Macarons Part I: Basic French Macaron Shell


They say that making macarons is an endeavour best left to the French. After several failed attempts, I realised that there is a lot of wisdom in that adage.


Except that when I want something, I will not stop until I succeed. Maybe it's the law student ambition in me; maybe it's my passion for food that doesn't let me shy away from a challenge.


Using David Lebovitz's blog as a starting point, I read and read about the meticulous method of making macarons. As Lebovitz explains in "Making French Macarons: Instructions & Recipes", making macarons is more about technique rather than following a recipe. For tips on macaron shell technique, I found David Lebovitz, Duncan Markham at Syrup and Tang and Corry at Bake It Off to be the most useful sources on the internet.

I tried out two recipes: Duncan Markham's recipe for a basic French macaron and Pierre Hermé's recipe for hot sugar syrup macarons. These recipes were by no means fool-proof or simple to master because they didn't involve the use of cream of tartare or lemon juice to aid the formation of stiff peaks in the egg whites. It took me about 15 eggs, almost 1kg of almond meal and 3 whole days in the kitchen to make a decent macaron shell. There were tears, tantrums and the spontaneous shouting of "Why!" and "It's not fair!" in my sleep. But imagine my joy when I'd made a bona fide French macaron!


However, it was a long learning process. My first few attempts came out porous and deflated. I couldn't understand why - I'd followed the recipes to the T. Dan's mother Barb suggested that I start from basics, beating an egg and making meringue. It made sense, getting to know the science of how the ingredients interact with each other, taking one step at a time. So that's what I did - no colouring and no added flavours (my ambitious strawberry syrup did not work with the macaron batter). I focused on the 4 ingredients used in Duncan Markham's recipe: egg whites, almond meal, icing sugar and castor sugar.

Working with the 4 ingredients


Egg whites


Using 1 egg, I tested how far I could beat it without curdling it. This gave me a better grasp of what soft, medium and stiff peaks looked like. The best way to test which stage you are at it is to stop beating every minute or so and lift the beaters out to see. When it reaches soft peaks, the egg whites will look like a sudsy foam with visible bubbles. Medium peaks means that the bubbles are barely visible and when you lift the beaters out, it will rise up and flop back down. I couldn't actually reach stiff peaks without castor sugar (as it helps bind egg whites). You will know you've got stiff peaks when the mixture is glossy, has obvious ripples and when you lift the beaters the peak will stand up on its own. Edit: Between medium and stiff peaks, the castor sugar will make the egg whites increase in volume. If it decreases in volume again, you've overbeaten it. However, it is salvageable. Bake at a lower heat for longer so that you don't get a hollow shell.


Beating egg whites is finicky enough but with macarons there are about 4 other fronts you have to worry about:


(1) Fineness and dryness of almond meal
Whether you use whole almonds (raw, not blanched) or packaged almond meal from the supermarket (which I found doesn't work that well anyway) you need to prep it before using it in macaron mix. Fineness isn't crucial but creates a smoother shell so that it's nicer on the eyes. Dryness, however, is key because excess moisture will cause the egg whites to collapse. Preheat the oven to 150°C. Blitz the almonds or almond meal in a food processor for 1 minute. Remove lid and use a spatula to loosen all the ground almond at the bottom. Blitz for another minute. Spread into a thin layer on a baking tray. Put in the oven for 5 minutes. Cool completely.


(2) Dryness and temperature of egg whites
As egg whites contain water, you want to dry out that excess moisture for perfect macarons. To do this, separate your eggs 2 days in advance. Place the egg whites in a shallow bowl and let stand at room temperature. You can cover it, but use something that'll let it breathe, like a tea towel. Egg whites beat better at room temperature, so don't fridge them during these 2 days!


Just piped


Rested for 20 minutes


(3) Speed of incorporation
One of the most important things I learnt during my mistake runs is that you need to be fast when incorporating the dry ingredients with the wet ingredients. If you work too slowly, the egg whites will deflate and your macarons will be firm and chewy. When folding the dry ingredients into the egg whites, scrape the edge of the bowl in a semi-circle, then fold into the middle. You want to get rid of the excess air so use a bit of force.


(4) Prepping your utensils
For beating egg whites in general, always beat in a clean glass bowl, making sure that the bowl and the beaters are completely dry to begin with. Use the smallest bowl you can so that the egg whites will get maximum beatage. When baking, use thick baking trays, or stack two together (with no gap in between), lined with baking paper. You can stick down the baking paper with blobs of macaron mixture in each corner.


Macarons au blanc monté (French meringue)
Recipe courtesy of Duncan Markham ("La Macaronicite 2: basic technique and simple macaron recipe", Syrup and Tang)


1 part egg white (50g)
1.3 parts almond meal (65g)
1.6 parts icing sugar (80g)
0.8 parts castor sugar (40g)


Blitz almond meal and icing sugar in a food processor for 1 minute.


Beat the egg whites on a medium speed until medium peaks form. Gradually add castor sugar and beat until stiff peaks form.


Sprinkle half of the dry ingredients over the egg whites and fold in with a spatula. Fold in remaining dry ingredients. This is also when you would add food colourings.


When done, you should be able to make a ribbon on top that takes at least 30 seconds to disappear.


Prep baking trays and spoon batter into piping bag with a 1cm wide nozzle.


Holding the nozzle close to the baking paper, pipe your macarons about 4cm apart. Try to make them round and flat (you can dip your finger in water and smooth out the tops if needed).


Tap the tray on a flat surface to get rid of excess bubbles.


Preheat the oven to either 120°C (baking time: 20 minutes) or 180°C (baking time: 9 minutes).


Rest the shells after piping for at least half an hour in a dry place.


Bake for 18-20 minutes in the middle shelf. If doing more than one tray, bake one tray at a time.


Remove baking paper from tray and cool on a wire rack. Gently remove macaron shells from baking paper and continue cooling face up on the wire rack.


Refrigerate in an air-tight container for at least 1 day before filling.


9 minutes at 180°C


20 minutes at 120°C


Stay tuned for the hot sugar syrup recipe and ganache filling!


Sunday, March 7, 2010

Olive Bread

Who doesn't love a beautiful, warm piece of fresh bread? If you've ever made your own bread, or have bought bread from Brasserie Bread, you'd know that store-bought sliced bread does not come close at all to a fresh loaf made with love. This olive bread with potato slices and fresh rosemary on top is a taste sensation. A crispy potato crust, melt-in-your-mouth soft and fluffy bread on the inside, pieces of olive and the aroma of roasted rosemary... DELICIOUS!

Adapted from the olive bread recipe on Taste.com.au

2¼ cups plain flour
2 teaspoons dried yeast
2 teaspoons castor sugar
1 teaspoon sea salt
1 cup warm water
1 cup pitted kalamata olives, dried and roughly chopped
2 teaspoons milk
1 small potato
Fresh rosemary leaves, roughly chopped
Melted butter for brushing

Sift flour into a large bowl. Combine with yeast, sugar and salt. Make a well in the centre and add water. Mix well until dough forms and knead on a floured surface for 10 minutes. Kneading not only helps the bread rise, it's my favourite part of the process. Show it a bit of love, get to know your food.

Place dough in a lightly oiled bowl. Cover with a damp cloth and place in a warm place for one hour.

Preheat oven to 170°C.

Punch the dough with your fist to get rid of excess air.

Place on a flat and floured surface. Knead olives in. The juices from the olives may come out and separate the dough slightly, that's okay. This is what makes the lovely pull-apart bits inside the bread.

Roll into a flat oval and place on a greased baking tray.

Brush lightly with milk to create a crust.

Wash and peel the potato. Slice the potato thinly with a vegetable peeler. Place the ribbons of potato on top of the dough. Brush with butter and sprinkle with rosemary.

Bake for 40 minutes.

Rest for 5 minutes before serving.


I love how rustic this feels with my homemade bread on a chopping board my boyfriend made himself.

Fantastic with butter (butter, not margarine!), dipped in olive oil and freshly-cracked pepper or toasted with grilled gorgonzola and prosciutto. Enjoy!

Friday, February 26, 2010

Roasted Lamb Rack

This roasted lamb rack is cooked with Jamie Oliver's homemade barbecue sauce (from his Jamie At Home series) slowly in the oven and served with potato chips and guacamole.

I bought this beautiful rack of lamb from the butcher this morning (smaller racks, around 4 cutlets, are usually readily available at butchers). I love this cut for its tenderness and its outer layer of fat that seals in all the juices during cooking. Best served rare to medium rare, lamb cutlets are deliciously pink and juicy on the inside. With the barbecue sauce, the lamb is smoky and fragrant with a hint of sweet and hot. Homemade potato chips and a tangy guacamole dip make this a fantastic meal to share between 4 (or an epic meal between 2!).

Jamie Oliver's Homemade Barbecue Sauce

1 heaped teaspoon cumin seeds
2 teaspoons fennel seeds
5 cloves
Salt and pepper
1 bunch fresh thyme, leaves picked
1 bunch rosemary, leaves picked
1 orange, zested and juiced
1 bulb garlic, peeled
4 heaped teaspoons sweet smoked paprika
6 tablespoons balsamic vinegar
½ cup organic tomato ketchup
8 tablespoons olive oil
10 bay leaves

Grind cumin seeds, fennel seeds, cloves, salt and pepper in a mortar and pestle.

Chop thyme and rosemary leaves, orange zest and garlic together finely.

Combine with herbs in a large bowl and add all other ingredients.

Roasting the lamb rack


Using a large zip-lock bag, place in the lamb rack and half of the barbecue sauce. Rub the sauce into the meat.

Add jalapeño peppers for some heat.

Seal and marinate in fridge for at least 2 hours.

Preheat the oven to 200˚C.

Roast for 40 - 60 minutes, depending on how rare you want your lamb. Baste the rack with the remaining barbecue sauce halfway through.

Rest for at least 15 minutes so that the meat relaxes and retains maximum juiciness.

Carve and serve!

Homemade potato chips


1 potato
1 sweet potato (optional)
Oil for deep-frying
Salt to season

Heat the oil in a wok over medium high heat.

Cut the potatoes into thin slices (about 2-3mm).

To find the perfect temperature for deep-frying, place a thick piece of potato in the oil. When it turns golden brown, the temperature of the oil is just right.

Drop potato slices carefully down the side of the wok. Cook the potato in batches to keep the oil at the right temperature.

When golden brown, remove from oil and dry on paper towels.

Salt lightly.

Guacamole

1 avocado
½ brown onion
6 - 8 yellow grape tomatoes
Juice of half a lemon
Salt and pepper
1 teaspoon chopped chives to serve

Blitz the avocado, onion, tomato, lemon juice, salt and pepper in a food processor to your desired consistency.

If you can't find yellow grape tomatoes, finely dice 1 red tomato and mix in by hand.

Garnish with chives.

Enjoy!

Wednesday, February 24, 2010

Garlic and Butter Pork with Creamy White Wine Sauce

Garlic and butter pork loin chop, served with spinach and mushroom in a creamy white wine sauce. I love days like this in the kitchen!

75g butter
1 clove garlic, crushed
½ onion, finely diced
1 teaspoon olive oil
400g pork loin chops
100g button mushrooms, stalks removed and sliced
200g baby spinach leaves
White wine
3 tablespoons cream
Salt and pepper

Serves 2

Cook pork chops, half the butter, olive oil, onion and garlic in a pan over medium, careful not to burn the butter. The pork will take 3-5 minutes on each side, depending on the thickness of the chops.

Remove pork, onion and garlic from the pan, leaving the oil and juices.

On low heat, add a bit more butter and sautée mushrooms for a few minutes.

When the mushrooms are soft and silky, turn up to medium heat and add just enough white wine to cover the base of the pan. Wait till the alcohol is cooked out.

Add remaining butter, cream, spinach and the onion from earlier and stir until the spinach has wilted.

Season with salt and pepper.

Enjoy!

Saturday, February 20, 2010

African Food Safari: Mahindi Ya Naz

Translating to mean 'corn in coconut sauce', this Swahili Coast dish is made of up three parts: mahamri, a deep-fried coconut and cardamom bread; corn slowly cooked in coconut milk, onion, tomato puree and turmeric; and suqaar, a stir-fry of lamb, onion, capsicum and tomato puree.

The first thing I noticed while looking at this recipe is that it's easy on the spices and cooking time. Nonetheless, it took quite a bit of labour to make (around 2 hours).

The mahamri was the most fun to make. Making the dough was simple enough (combine the dry ingredients with the wet ingredients) but because of the coconut and cardamom, it instantly smelt like no bread I've ever tasted. I'm just a little disappointed that I used desiccated coconut instead of coconut milk powder and my mahamri didn't rise as much. In any case though, it turned out fragrant and delicious.

The corn and suqaar were surprisingly mild in taste. The corn and onion were juicy and sweet, complemented nicely with the smooth and creamy coconut sauce. The natural flavour of the lamb is the focus of the suqaar, slightly sweetened by the onion, capsicum and tomato. When combined with the corn and mahamri, each mouthful was strangely delightful - sweet, mildly spicy, meaty. In other words, exotic yum!

Recipe by Shukri Abdi in the Food Safari cookbook.